Make.com is the fastest path for beginners to build sellable automations — but only if you budget credits up front, master the mapping and date-time gotchas, and plan for scale before you turn a single scenario on. The “just sign up and automate in 10 minutes” pitch ignores the real traps: blank mappings, hidden credit consumption, and migration costs that quietly eat your time and money.
This isn’t for you if you want a passive income blueprint with zero tool spend. If you can’t commit £0–£30/month and a few focused evenings, close the tab. Make.com rewards people who iterate — not people who dabble.
The Promise Is Real. The Setup Is Not What They Show You.
Every Make.com demo shows a polished scenario running in seconds. A form submission fires, data lands in Airtable, Slack pings the team. Clean. Instant. Effortless. The classic “it works in my machine”.
Production is different. You’ll hit blank data in mapped fields. You’ll watch a date filter report the wrong hour after a daylight savings shift. You’ll spend an afternoon on something that should take 20 minutes.
None of that means Make.com is the wrong tool. It means the demos skip the part where you actually learn it. Get excited and click ‘Create’ without a plan and you’ll burn hours and credits before your first scenario does anything useful.
This article gives you the plan.
What Make.com Actually Costs Before You Build Anything
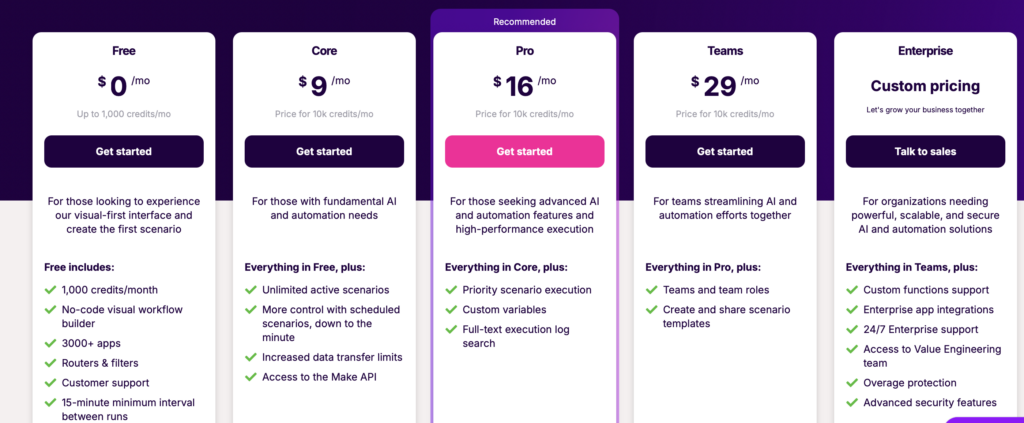
Make.com costs £0–£16/month depending on the plan you need — and choosing wrong is one of the most expensive beginner mistakes you can make.
Before you design a single scenario, understand what you’re buying.
Make.com’s free tier includes 1,000 operations (credits) per month, according to their pricing page. That sounds generous until you realise that each action inside a scenario — each module that runs — consumes one operation. A five-step workflow that fires 50 times a day burns 250 operations daily. You’ll hit the free ceiling in four days.
Pick the wrong plan and you can waste £100s a year on needless upgrades or overage credits. Here’s how to avoid that:
- Free — 1,000 ops/month, £0: Testing only — not production
- Core — 10,000 ops/month, ~£9/month: 1–3 simple workflows, low frequency
- Pro — 10,000+ ops/month, ~£16/month: Unlimited active scenarios, higher volume
My rule: If you’re building for a client, start on Core. If you’re running more than three active scenarios, price in Pro from day one. Discovering you need an upgrade mid-client-project is a bad conversation to have.
Credit budgeting before you build:
- Count the modules in your planned scenario
- Estimate how many times it fires per day
- Multiply: modules × daily fires × 30 = monthly ops needed
- Add 30% buffer for test runs and errors
Do this before you commit to a plan. Not after.
The Stack You Actually Need to Ship a First Paid Workflow
You don’t need 40 apps connected before you start. You need three things working cleanly.
One Make.com community member described a workflow that captures the core pattern well: “When a new lead fills out a form on my website, their info is added to Airtable, and my team gets an instant Slack notification; Shopify orders trigger a confirmation email, update inventory in Google Sheets, and notify the team — all automated with Make,” they wrote in the Make community forum.
That’s the template. A trigger, a data store, a notification. Everything else is variation.
Minimum viable stack for a first paid workflow:
- Trigger source: Google Forms, Typeform, or a webhook (free)
- Data store: Airtable (free tier covers most beginner use cases)
- Notification layer: Slack or Gmail (both have Make.com integrations)
- Make.com plan: Free to test, Core (~£9/month) for production
Start with the wrong stack — say, a CRM that requires OAuth re-authentication every 30 days — and you waste 5–20 hours onboarding tools instead of shipping a first paid workflow. Stick to apps with stable Make.com connectors and clear documentation.
[Image: Make.com app directory showing Airtable, Slack, and Google Forms connector status]What to have ready before you open Make.com:
- API keys or OAuth connections for each app (set these up first, not mid-build)
- A test dataset — real-looking fake data to run through the scenario
- A clear trigger condition written in plain English before you touch the UI
Build the Lead Capture Workflow: Step by Step
This is the scenario that earns you your first client payment. A lead fills in a form → their data lands in Airtable → your client’s team gets a Slack notification. Simple. Sellable. Repeatable.
Miss one data mapping step and this workflow will send empty rows to Airtable or fire blank Slack messages — costing client trust before you’ve invoiced them.
Step 1: Create the scenario
Open Make.com. Click ‘Create a new scenario’. Don’t use a template — build from scratch so you understand every module.
Step 2: Set the trigger
Add a Google Forms or Typeform module as your trigger. Set it to ‘Watch Responses’. Run a test submission immediately — you need real data in the trigger output before you map anything downstream.
[Image: Make.com scenario builder showing Google Forms trigger module with test data populated]Step 3: Add the Airtable module
Add an Airtable ‘Create a Record’ module. Connect your base and table. Now map each field from the trigger output to the Airtable columns.
Critical: Only map fields that appeared in your test submission. If a field shows as empty in the trigger output, it will arrive empty in Airtable. Fix the test data first, then map.
Step 4: Add the Slack notification
Add a Slack ‘Send a Message’ module. Map the lead’s name and email into the message body. Keep it short — one line with the key details.
Step 5: Run a full test
Submit a real test form entry. Watch the scenario execute module by module. Check Airtable for the new row. Check Slack for the message. If either is empty or missing, stop and debug before activating.
Step 6: Activate and set the schedule
Set the scenario to run every 15 minutes (Core plan minimum). Activate it. Send your client a screenshot of the first live execution.
Test Small, Test Often — Or Spend a Day Debugging Nothing
The single most expensive habit beginners bring to Make.com is building the whole scenario before testing any of it.
Here’s what happens when you skip small tests: you run the full scenario, something fails, and you have no idea which of the seven modules broke. You start from the top. You waste four hours.
Two specific failure modes will catch you if you’re not looking.
Blank mapping errors. One Make.com community user described it exactly: “I run the trigger module and map fields, but when I run the next module the test shows blank data and I get a bundle validation error where it says my fields are empty,” they posted in the Make community forum. This happens when you map fields before running a test on the trigger. The trigger has no data yet, so the mapped fields reference empty variables. Fix: always run the trigger module first, confirm data appears, then map.
Date and time filters. This one is subtle and brutal. A Make.com user reported: “I use the Date Time function in Make; after daylight savings it reported the wrong hour (e.g. showed 12:33 when it was 13:33) — time/date formatting and parseDate/formatDate filters trip up beginners and break flows,” they wrote in the Make community forum. If your workflow involves scheduling, timestamps, or date comparisons, set your timezone explicitly in every date module. Don’t rely on Make.com’s default — it will betray you twice a year.
The progressive build rule:
- Build one module → test it → confirm output → build the next
- Never map a field you haven’t seen populated in a test run
- For any date/time logic, test with a date that crosses a timezone boundary
Skip these habits and broken mappings or date filters can silently fail, costing you 4–12+ hours to debug per workflow.
Where Beginners Actually Get Stuck (And What It Costs)
LinkedIn will tell you Make.com has a gentle learning curve. The actual experience is different.
One Reddit user put it plainly: “I’m spending 10 hours of my day automating something that takes 3 minutes,” they wrote in r/Make. That’s not a failure of intelligence — it’s a failure of sequencing. They built before they understood the data model.
The three sticking points that cost beginners the most time:
1. Mapping before testing
You cannot map what you haven’t seen. Run the trigger. Get data. Then map.
2. Bundle validation errors
When a module throws “bundle validation error,” beginners assume the module is broken. Usually it’s the upstream data. The field you’re mapping is empty because the trigger test didn’t return it. Go back to the trigger, run it again with a complete test submission, and re-map.
As the community post noted: “when I run the next module the test shows blank data and I get a bundle validation error where it says my fields are empty” — this is the most common beginner failure mode.
3. Date/time logic that breaks silently
Workflows that involve scheduling or date comparisons will work fine — until they don’t. The daylight savings issue is real: “after daylight savings it reported the wrong hour (e.g. showed 12:33 when it was 13:33),” per the Make community. Silent failures here mean your client’s appointment reminders fire at the wrong time. You won’t know until they complain.
Fix: use parseDate with an explicit timezone string. Never leave timezone as “automatic.”
Get stuck on these three and you waste days — or hand the job to a contractor — losing billable time and credibility with clients. Depending on client scope, that’s £200–£2,000 in lost or delayed revenue.
Where Make.com Is Heading — And Why It Matters for What You Build Now
This isn’t abstract futurism. It affects what you build today.
Make.com’s own 2026 trend report states: “AI agents will become workflow engines — detecting work, initiating actions, and completing multi-step tasks without waiting for a human prompt,” according to Make.com’s webinar on AI automation trends.
That shift is already happening. Scenarios that were “trigger → action → action” are becoming “trigger → AI decision → conditional action → human escalation.” The architecture is different. If you build rigid, linear scenarios now without understanding where the AI decision points will go, you’ll rework them in 12–18 months.
What this means for beginners building paid workflows:
- Build scenarios with clear decision points — even if those decisions are currently manual
- Document your data flow (what goes in, what comes out of each module) — this is what you’ll hand to an AI agent later
- Price your client work to include a “workflow review” at 12 months — this becomes recurring revenue when the architecture changes
Ignore agent trends and you’ll rework automations later — costing migration hours and missing the opportunity to productise workflows for recurring income.
Start Here, Not There
Make.com‘s free tier gives you 1,000 operations per month — enough to test, not enough to run a client workflow in production. That’s the right starting point: test on free, invoice on Core.
The lead capture workflow described above — form → Airtable → Slack — is the one that Make.com community members consistently describe as their first sellable automation. It’s simple enough to build in an evening. It’s valuable enough to charge £150–£500 for, depending on the client.
Choose the wrong launch approach — building a complex multi-step scenario before you’ve validated the basics — and you delay your first sale by weeks. Build the simple one first, charge for it, then expand.
Pick Make.com if you’re billing clients within the next 30 days and want a visual tool that non-technical clients can understand when you walk them through it. Skip it if you need to run more than 50,000 operations a month on a tight budget — at that volume, n8n self-hosted undercuts the Pro plan significantly.
Your next three actions:
- Sign up for Make.com and build the three-module lead capture scenario this week — not next week. It’s the fastest path from zero to a paid workflow, and it costs nothing to test.
- Run a test submission before you map a single field
- Set your timezone explicitly in every date module before you activate anything
The first paid workflow is the hardest. After that, you’re iterating on a pattern you understand.